While you're saving up for a bigger remodel, you can make do with smaller, less expensive improvements. For example, we bought a house with a kitchen we didn't really like because the price and location were perfect. Instead of rushing into remodeling right away, we lived in the house for a while (which is good advice to avoid post-remodel regret, by the way). During that time, we realized we needed a much bigger remodel than we originally thought. And, more importantly, we realized we wanted to pay off our mortgage before remodeling.
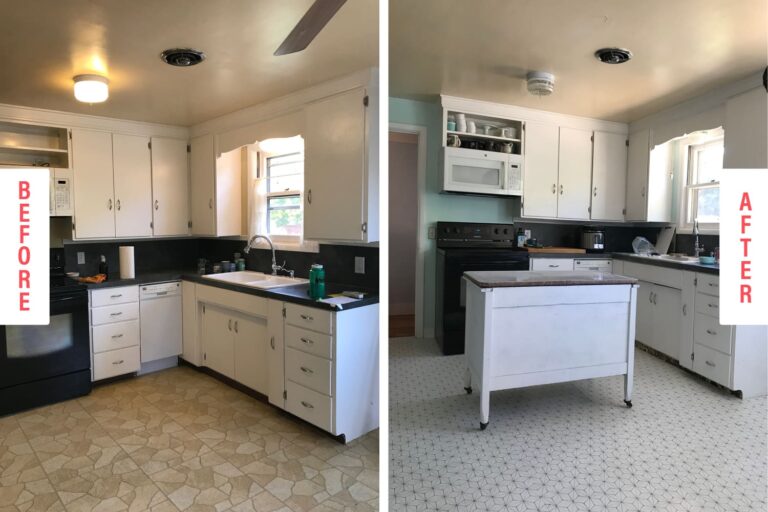
Our kitchen is small and outdated, but otherwise functional. It gets lots of natural light, and we added an island (which we painted!) to give us more workspace. But for two years we've been struggling with worn-out linoleum. It's beige, cracked, stained, and never looked nice. I spend a lot of time in the kitchen (trying out recipes from this site and feeding a family of four). We didn't like our floors, and we were itching to redecorate. So this spring, we decided to spend a little money on an easy update: peel-and-stick tile!
Here we explain how the temporary update came about, and how the peel and stick tiles are holding up to daily use in a busy kitchen.
Why Buy Peel and Stick Floor Tiles?
In fact, we got a quote of $1,200 to replace our old linoleum with a wood floor that would match the rest of the house. It didn't seem like a good idea to spend that much money, especially since we want to completely change the layout of this area of the house. A friend suggested painting the floor, but while that would hide the general stains on the linoleum, it wouldn't hide the cracked corners. Plus, we didn't like the texture of the existing floor. Peel-and-stick tiles are under $300, and you can pick your tile and do the work yourself. Plus, if you don't like it after six months, you can always peel it off!
To decide on a color and pattern, I ordered a few different packs of tiles from Amazon and ultimately decided on the FloorPop tiles in a light gray grid pattern. Before ordering, I skimmed through reviews and did a little research. Many people pointed out color differences and issues with the pattern placement, so I ordered extra tiles just to be safe.
Peel and Stick Tile Installation
The peel and stick tiles should be easy to install, as you just peel off the paper and stick the tiles sticky side down. Admittedly, it would have been easier to install solid color tiles instead of patterned ones. The first hurdle in installing the tiles was actually when I opened the box. The white of the tiles varied, some were warm whites and some were cool whites with a bluish tint. Many of the tiles had printing errors, and some were so overprinted that they were practically unusable.
After sorting the tiles into warm colors and pale whites, discarded tiles, and tiles that could still be used if cut up or hidden under cabinet trim, we sanded the floor down. We were a bit hesitant about whether to put all-purpose floor adhesive on the floor, which is said to make the floor more tacky and bond better in the long run. We decided to skip that step, which we may later regret, but more on that later.
What I thought would take a few hours to lay the tile actually took two days. My husband spent two days frantically laying the tile pattern, swearing, trimming the tile, swearing, and finally installing the trim in most of the kitchen. I did my best to stay away from the tile for the first 24 hours after it was laid, and then I got on my hands and knees to clean the tiles with a mop before moving the island cart and kitchen table back in. A few days after laying the tile, we replaced a few tiles that didn't stick well or had shifted under the weight of moving furniture around.
Our kitchen instantly became brighter, more beautiful, and more enjoyable to be in. The final cost for 120 square feet of tile and trim was $250 (we bought the tile on Amazon for the best price). I think it was the best purchase we've made this year on our home. Getting the tiles to line up perfectly also gave my husband headaches, because evenly lined tiles made the floor look more seamless and polished.
Now, several months later, we still love the look of the tiles. I can't tell you how much better the floor looks and how much easier it is to clean. But, and this is a big “but”, there are still some tiles that have loose corners or are a little out of place with each other. It doesn't bother me too much, as the floor looks less messy than it was before. But my neat freak husband has big ambitions to replace all the tiles as soon as he has the time. We don't expect the tiles to last five years, but we're praying for two. And by that time, hopefully, we'll be able to rip out all the old flooring and redecorate the whole kitchen.
Have you tried peel and stick tile in your home? How durable was it?


