and othersLike most millennials, I have grand visions for my kitchen. I obsess over deVOL, adore glossy sea-green tile, and drool over shiny hardware-adorned cabinets. A pantry! A kitchen island! These are the elements of the dream kitchen that makes up 90% of my saved Instagram posts.
The reality? It's too expensive.
It's no secret that kitchen renovations are expensive and time-consuming – a recent Which? survey found that a new kitchen can cost anywhere between £7,000 and £100,000, depending on the size and style. But as I'm 31, DIY-savvy and spend most of my free time scrolling through social media looking for renovation hacks and low-budget ways to do it, I decided to give it a go myself. Renovate your kitchen on a budget.
My budget is under £180 – I really mean it – and my secret weapon is peel and stick tiles, one of the latest home improvement trends that will make DIY a success.
Having beautiful tiles in your kitchen (and bathroom) is the ultimate status symbol in home decor, but they're not only expensive, they also require expertly done grout. Peel-and-stick tiles, on the other hand, do exactly what they sound like: they're perfect for rental properties; they go over existing tiles, walls and floors, don't require grout, and are quick to remove.
Still not sure? A quick look on social media shows fellow DIYers have been trying out the trend for months, with videos with the hashtag “peelandsticktile” racking up hundreds of thousands of views. It's now mainstream, with B&Q, Dunelm and Homebase all selling their own versions in a range of shapes and colours. I bought mine on Etsy, which has a huge selection.

The original kitchen had white PVC cabinets and grey laminate worktops.
I inherited an early 2000s kitchen: picture-perfect white PVC cabinets, white cottage tiles and grey laminate worktops. There was nothing new, nostalgic or fancy about it.
This isn't my first time dabbling in a kitchen renovation; during lockdown I've painted and recycled pretty much everything in the house as a diversion. I tried painting the dingy kitchen tiles with pink tile paint; the paint looked passable but didn't stand up to wear. The real surprise was the marble vinyl wrap I did on the worktop for £9.50 (1 metre), which faked the look of a marble kitchen and is still remarkably intact to this day.

During lockdown the kitchen was repainted green and pink, then repainted greige and green.
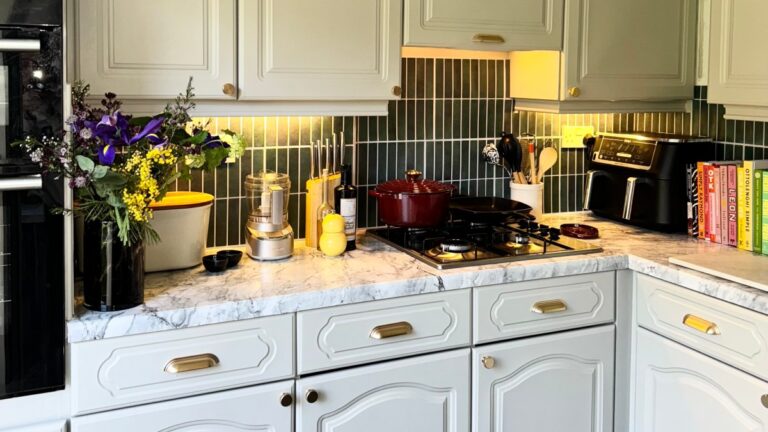
The room faces south, but isn't open-plan, so I wanted to make the decidedly dated kitchen feel as bright and modern as possible. For paint, I chose Lick Home's Greige 02 Soho Warehouse eggshell (£45 for a 2.5 litre tin) to balance the deep green of the tiles I had in mind, and I added new gold hardware to tie it all together.
Painting cupboard doors is an easy and inexpensive way to update your kitchen. I did it all over a weekend. All the usual prep for painting is needed, but no priming is necessary. All I did was give them a good wipe down with sugar soap to remove any grease or dirt, remove the old handles and cover with tape any parts of the wall that you didn't want painted. The 2.5 litre can was enough for two coats per cupboard, plus more.

Once the painted cabinet doors and frames were all dry I fitted new handles – a combination of vintage style cup handles for the drawers (£24 for 6) and knurled knobs for the doors (£28 for 10), all made from brass. I bought them on Amazon and they only cost me £52 in total – I found similar ones in Dunelm, B&Q and many other hardware stores.
All that's left is the tiles. At first it seemed like a daunting task but it was actually therapeutic. Tiling is messy and requires a lot of patience, especially if there are obstructions such as sockets. As the tiles are made of vinyl PVC, I used a Stanley knife and a chopping board, but a sharp pair of scissors would have been just as effective.

Cutting tiles with a Stanley knife
The linear tile blocks are 30cm x 30cm and come in a pack of 10 (10 sheets cover just under 1 square metre). I bought two packs for £64.80 and it was enough to cover my kitchen area. The adhesive is strong so it's important to make sure you're happy with the placement of the tile before fixing it to the wall. My tiles came with a handy squeegee tool to help hold the tile in place where the grout (actually the white plastic grooves) is.
Measure, cut, fit, trim, repeat. In the end, the “tiling” took only a few hours. It's not perfect, and I don't think it would fool any interior design guru, but combined with the new cupboards and handles, my efforts could be mistaken for a complete kitchen makeover.

Final Kitchen Remodel
The best part? No obligation, easy to use, and easy to remove. Easy to wipe clean, durable, and cost-effective. And if your hexagonal marble tiles go out of style next year, you can just remove them and replace them in a snap.
The thought of peel-and-stick tile or painting cabinets might make some people shudder. It's not for everyone, but it's a quick way to make your kitchen sparkle. I'm sticking with this idea, and I think I'll try it on my floors next.
My Budget
• 45 pounds of paint (only used half a can)
• Handle 52 lbs.
• Tile £64.80
• Total £161.80


